NodeJS: the beautiful callback err machine

One of the best things about NodeJS callbacks is their consistency. As in, most API calls require one and their method signature always follows the same pattern, and this is the most beautiful bit.

The first parameter of a callback is always an error object (which is null if no error occurred). This seems a little counterintuative at first. When you stop and think about it though, it really isn’t at all. My initial though was that most of the time, it isn’t going to be used, so why isn’t the result of the computation the first parameter? Well, that might be nice, but chances are you’re actually going to have to check to see if an error occurred first, before you start using your results, since if a error did occur, you probably don’t have any results anyway! Secondly, Node is cleverly reminding you that you should check for and deal with errors as they happen by ensuring you define a first parameter in order to define a second parameter to get at the stuff you want.

If the error was the second (or last) parameter the chances are you’d forget to define it, or the lazy would simply neglect to define it. This could happen because in JavaScript all parameters to functions are optional. Just because you do or don’t define parameters to a function, doesn’t mean you can’t call it with or without parameters. The function might not work in either of these cases, but nevertheless it is still possible to call it. It seems that by not coercing the programmer into defining an error parameter and dealing with it their code could become less robust.

The error parameter in the callback function is a necessity of asynchronous programming because errors cannot usually caught with a try/catch block as the execution of the callback function usually doesn’t happen in the block of code surrounded by the try/catch but instead in a later run of the event loop. I much prefer this way of dealing with errors as opposed to searching through my library code to find out if I even need to surround a function call in a try/catch by figuring out if it even does an operation that could possibly throw an error…and you know what, it’s future proof, because even if a function does no operations that could cause an error, it doesn’t mean that in a future version it won’t. By defining an error parameter from the start you can deal with a future mishap, now that is awesome.
David, a dependency management tool for Nodejs projects

I made a thing. I noticed that there wasn’t a way to visualise which of my Nodejs project dependencies were out of date. I saw a library called police which looked pretty awesome, but I wanted to provide a bit more of a service – A quick and easy way for developers to advertise that their project was up to date, in the same way that Travis provides a “badge” that always shows the current build status for your project.

Badges are great, everyone like badges. The Travis badge is an admission by the developers who work on the project that they’re committed to keeping their code base in working order for both consumers of the software and developers alike. Travis proves that their project works by ensuring it can be built successfully and that it passes any unit or integration tests the developers have written. Consumers and developers can see the build status of the project at a glance, without having to clone or checkout the code.

The David badge shows that the project developers are committed to maintaining and improving the project, keeping it up to date, secure, efficient and (hopefully) bug free by keeping abreast of changes in the code the project depends upon.

Of course, an “out of date” David badge can be a indication of a low level of project activity and a hint at the level of support you’re likely to get should you encounter a problem (not much).

Clicking on a David badge will normally take you to the project status page, which lists project dependencies, the version required by the project and the latest version available in the NPM registry. It gives you an idea of the complexity, size and scope of a project and most importantly, it shows developers what dependencies need updating! Here’s some examples

David is written in JavaScript, it uses Nodejs and NPM (of course). It was built from the GRUNTEND base with the Express web application framework.

Check out David here: david-dm.org

JavaScript test for integer / string

I couldn’t find either of these functions that satisfied my edge cases or desire for simplicity so I wrote/adapted some of my own. Feel free to use, modify, distribute without attribution, but I’d be eternally grateful if you did ;)

The test for integer is adapted from this post, which is actually almost spot on, apart from their is_int([0]) returns true, as does any integer in a string.

I’m pretty sure I’ve seen this test for string a hundred times on the internet and in books. It is by far the most robust:

Please let me know if you can break it!

CoffeeScript lazy singleton class instance function

Explanation

“@instance:” allows us to attach an object/value to the Foo class instead of Foo’s prototype. Recall that “@” in CoffeeScript refers to JavaScript’s “this”.

After “@instance:” there is a function that is immediately executed. This function returns a function, closed around a variable called instance. Both these functions have their context (their “this”) bound to the Foo object using CoffeeScript’s wonderful “define and bind” operator “=>” as opposed to the normal function definition operator “->”.

When called, the function that “@instance” ends up referring to simply checks to see if the “instance” variable is empty and if so, assigns a new instance of Foo to it. Newing up a Foo is done using the “@” symbol since the function’s “this” refers to the Foo object. It then returns the instance.

Output

The CoffeeScript above compiles down to this:

Using RequireJS exports with CoffeeScript

If you are using the “exports” object in your RequireJS module definition and happen to also be using CoffeeScript then be careful to either return the exports object at the end of the function or explicitly return nothing from the function by typing “return” on the last line. Like so:

define((require, exports, module) ->
    exports.foo = 'bar'
    return
)

If you don’t return nothing or the exports object CoffeeScript will compile this:

define((require, exports, module) ->
    exports.foo = 'bar'
)

…to the following javascript:

define(function(require, exports, module) {
    return exports.foo = 'bar';
});

Where the return value will be the string ‘bar’. This is no good because if you return a value from your module definition function, RequireJs uses it instead of the exports object. So when you come to require your module, you’ll be passed a String, rather than an object with a “foo” property as you’d expect.

jQuery CDN as A Named Module In RequireJS

If you want RequireJS to fetch jQuery from a CDN, you’ll need to tell it to do so using the “paths” config:

require.config({
paths: {
"jquery": "https://ajax.googleapis.com/ajax/libs/jquery/1.8.2/jquery.min.js"
}
});

As I understand it, if you want to use the local file fallback code a la html5bp you’re out of luck. For those of you who don’t know, the local file fallback code allows you to load jQuery from your own domain if the CDN version fails to load. It looks like this:

<script src="http://ajax.googleapis.com/ajax/libs/jquery/1.8.2/jquery.min.js"></script>
<script>window.jQuery || document.write('<script src="js/vendor/jquery-1.8.2.min.js"><\/script>')</script>

Arguably, if you’re using jQuery it is likely to be a global requirement rather than a requirement for one or two modules. The same sort of thing with BackboneJS. It might be better to place these global requirements in the HTML for your pages (before the RequireJS script) to save typing ‘jquery’ and ‘backbone’ in all your module definitions.

JSIO Performance Results

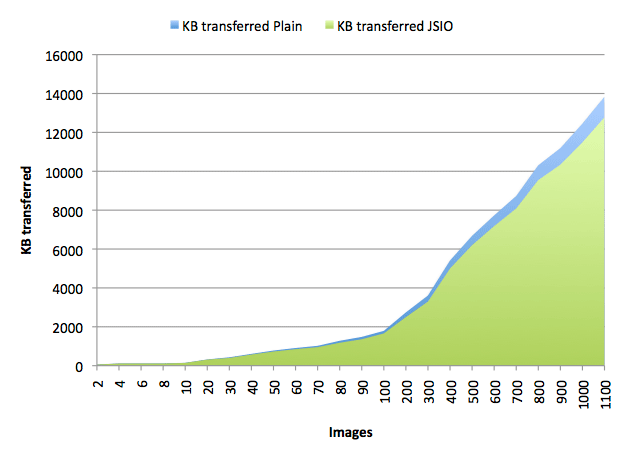
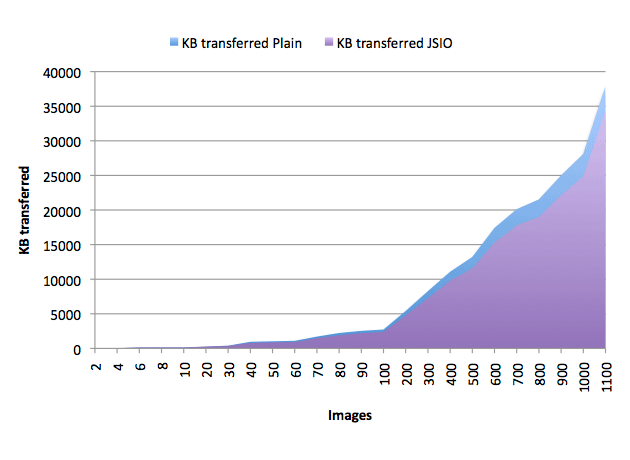
Below are two graphs plotting the number of images on a page against the total KB transferred by Chrome 13 for both a page with JSIO and without JSIO (which I, for some reason have called a “plain” page).

I build websites for a living, so I have a lot of folders of images from various websites lying around which form the two data sets for the graphs. I’d like to think of them as a typical set of website images, but you may argue that they are typical for the websites that I build.

I knocked up a script that when given a folder of images, will output a “plain” HTML page, a JSIO HTML page and a JSIO resources file with the following numbers of images on them: 2, 4, 6, 8, 10, 20, 30, 40, 50, 60, 70, 80, 90, 100, 200, 300, 400, 500, 600, 700, 800, 900, 1000 and 1100. Before generating any of the pages, the order of the images were randomised to better represent a web page’s inclusion of different images for different purposes.

Chrome 13 was used with the developer toolbar to determine how many requests were being made and the actual KB transferred (with slight rounding errors) by the browser. In my opinion I would say that Apache was set up to serve image and javascript content typical of many servers on the internet in that images were not gzipped but javascript files were; the register, bbc, for example.

What is interesting to note is that the number of bytes transferred by JSIO are consistently lower than the bytes transferred by a plain HTML page…but not by a lot. The file size inflation due to base64 encoding seems to cancel out a lot of bytes the gained from making fewer requests. However, it is obvious that JSIO won’t actually lose you any bytes, but it isn’t going to save you a substantial amount. That said, saving bytes isn’t the only benefit of JSIO, remember that one of JSIO’s goals is also to alleviate some of the problems surrounding the creation and use of image sprites – which it does also do very well.

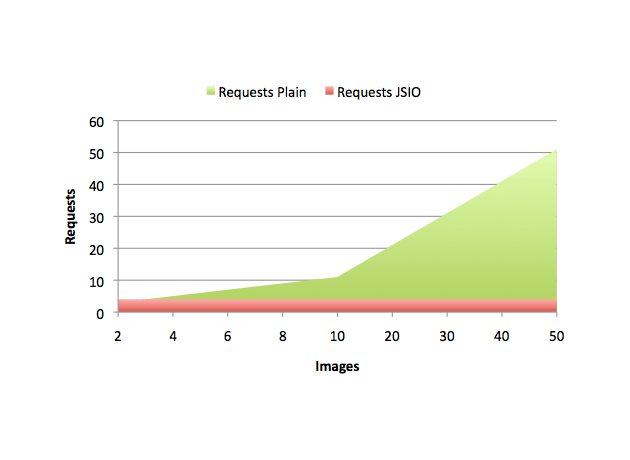
The graph below is just for fun, it plots the number of requests made by JSIO pages against the number of requests made by plain HTML pages. Note the JSIO pages make a constant 4 requests (index.html, jsio.js, jsio-resources.js and jsio.gif) independent of how many images are on the page:

JSIO URLs

The clever bit about JSIO is the placeholder URLs – i.e. the “jsio.gif#…” that goes in your image src attributes and background-image CSS properties. Everything after the “#” is the filename of the image that should be displayed. It doesn’t have to be the filename at all, it could just be a single letter or number or symbol or whatever. It doesn’t matter to JSIO. To JSIO, everything after the “#” is just a key into the resources object that holds data uri encoded images. As long as the key is unique (which it will be if you use filenames, since no two files in the same directory can have the same name), JSIO is happy.

Using filenames as keys into our resources object is beneficial to humans. Much more beneficial than coordinates in a sprite, simply because (hopefully) the filenames are meaningful; they describe the image. In comparison to sprites, the JSIO resources object also makes maintaining your image data much easier as it is trivial to add or remove images without having to move other images around within the sprite (and consequently all coordinates referencing your moved image).

Another benefit of using filenames as keys into the JSIO resources object is for fallback. If JSIO detects your browser is IE7 or lower, it’ll strip out “jsio.gif#” leaving just your image key as the image src, which is hopefully a valid URL to the original image. Also, if JSIO detects you’re running IE8 and the image data is larger than 32KB it’ll do the same thing*.

* …but not yet in v1.0.0 alpha

Since the image key is after the “#” (it is the URL “fragment”), your browser won’t send multiple requests for the 1*1px jsio.gif file – it’ll just send one request, cache the response, and use it again. By the way, the jsio.gif image is just a transparent 1*1px gif (for maximum efficiency), but it could be an “spinner” image or something, which is shown temporarily whilst the JSIO resources file is downloaded.

This post is about JSIO – JSIO is a tiny library that allows you to make fewer requests to your server by packaging all your site image data in a JavaScript file in data uri format. The official site for JSIO can be found here: jsio.freestyle-developments.co.uk. You can read more about why I started this project here.

JavaScript Image Optimiser (JSIO)

So, I’ve embarked on a new mini project. It is kind of inspired by image sprites.

Image sprites are a great idea, but come with a whole bunch of issues that make them a bit of a pain to work with.

Firstly, most of the time you have to use markup to create an element in html to “hold” the image you wanted to display from your sprite. This is because if you actually set a sprite as the background image for a large html element you’re likely to see other images in the sprite as well. Because of this, you actually lose useful functionality that CSS gives you, like the ability to position, repeat and scale an image. Also, the markup you’ve created to hold the image exists for style purposes, which is bad.

Secondly, sprites can be a massive ball ache to maintain. If you’ve closely packed your images in a sprite for maximum efficiency and then one of your images needs to change size, you’re either going to have to move ALL images surrounding the image you have to update (and obviously then change all background-position properties for the images you’ve moved) or leave a space and put the updated image in a new position in your sprite.

How do you know which images in a sprite are used and which ones are dead? Since your images are referenced by coordinates, this sort of clean up becomes a nightmare and is actually a bit lot of a nightmare to create image sprites in the first place.

The goals of the project are to

  1. Reduce the number of http requests (and their associated header traffic) to the server and hence reduce the time it takes to load all images on a website and bandwidth footprint the site requires
  2. Create a solution that’ll alleviate some of the problems surrounding the creation and use of image sprites
  3. Do something cool

The JSIO project website has a pretty good explanation of how it works so I won’t bore you with the details here. However, as a brief overview, it packages all your image data in data uri format and you reference particular images by their filename rather than their coordinates.

The site actually uses the HTML5 file api to generate your resources file for you, which makes creating and maintaining your JSIO “sprite” really really easy.

I read *somewhere* that data uri encoded images can be up to 1/3 larger than corresponding image files, however with gzip encoding they can be only 0-3% larger (or less). My thesis is that for a site with many small images, JSIO could be more efficient and easier to maintain than having separate files or even an image sprite.

…I’m yet to prove or disprove this and I’ll be conducting some tests whose results I’ll post up here (even if they do prove JSIO to be useless).

Disclaimer: This is the first ever ALPHA release of JSIO – it works on the latest Firefox and Chrome but I haven’t even checked it in IE yet. It probably won’t work in IE yet. Also, the website needs some work for optimal display on mobile devices.

The difference between using single quotes and double quotes as string delimiters in JavaScript/PHP

I like to keep all my string delimiters in languages such as PHP and JavaScript consistent. I consistently use single quotes for a couple of good reasons, so when I encounter someone else’s script that uses double quotes the OCD in me makes me change them all to single quotes…but that is a different problem.

If you’re coming from a language such as C# or Java then note that in PHP and JavaScript there is no such thing as a character datatype – as such, you can use either single or double quotes to delimit strings.

If I could only give you one reason why I consistently use single quotes then I would have to go with this:

If you ever (God forbid) need to write HTML in a string, you don’t need to escape the double quotes around attribute values. Instead of:

    "<div id=\"foo\" class=\"bar\">foobar</div>"

You write:

    '<div id="foo" class="bar">foobar</div>'

…which is lots less characters to type and I’d say more readable. Also, I more frequently use double quotes in my JavaScript/PHP strings than single quotes so it really does make sense.

The other reason is that if you use double quotes, PHP will actually parse the contents of the string to find variables and escape characters (\n, \r, \t etc.) which it’ll replace with the variable value or correct escape character respectively. So for example:

<?php

    $baz = 'bar';
    echo "foo\n$baz";

?>

Will print:

foo
bar

Whereas:

<?php

    $baz = 'bar';
    echo 'foo\n$baz';

?>

Will print:

foo\n$baz

So if you don’t need any of this functionality in your string, you’re making PHP do some extra work for no reason.